How to Accompany Timmy Clifford’s Jig on Irish Bouzouki (Step-by-Step Guide)
 Declan Plummer
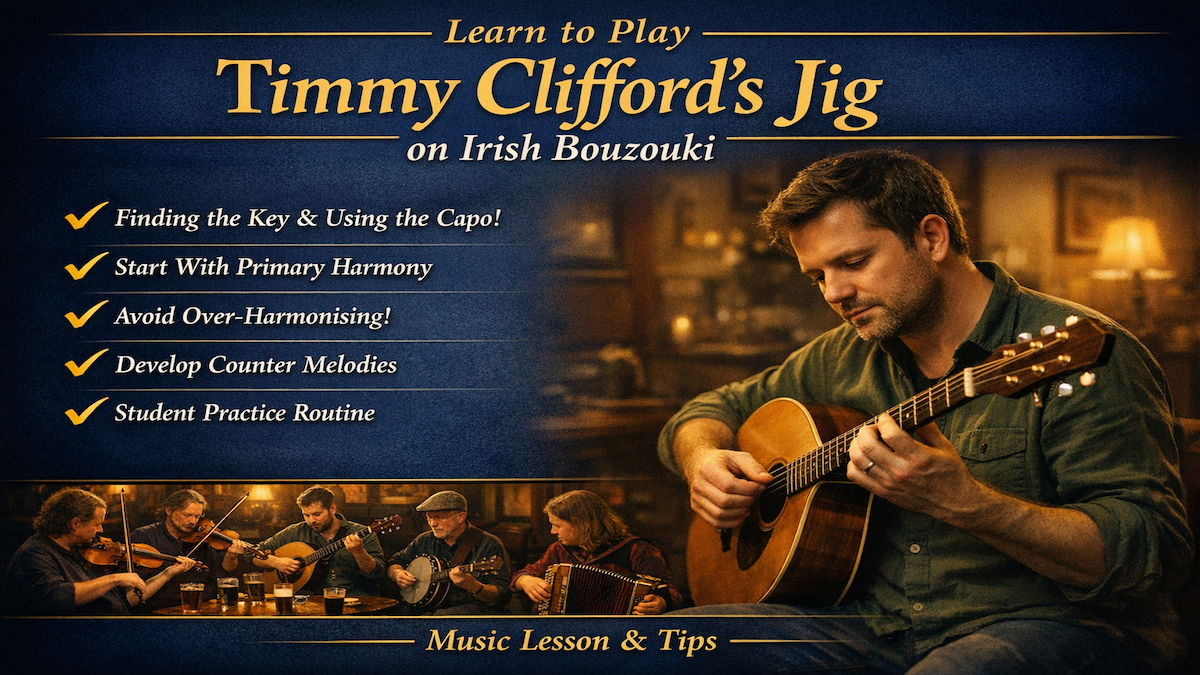
Learn Irish bouzouki accompaniment using chords, capo, and counter melodies for Timmy Clifford’s Jig in this practical step-by-step guide.
How To Accompany Timmy Clifford's Jig On Irish Bouzouki
This lesson explains how to build a musical Irish bouzouki accompaniment for Timmy Clifford’s Jig by identifying the key, placing the capo correctly, finding the tonic drone, starting with primary chords, adding one important secondary chord, and shaping simple counter melodies without overcrowding the tune.
The focus of this lesson is not simply learning a set of fixed chords. It is about hearing how the tune works, finding the tonal centre by ear, and then using that understanding to create accompaniment that supports the melody rather than fighting with it.
Timmy Clifford’s Jig was approached here as a fresh tune, which makes the teaching especially useful. Instead of presenting a polished arrangement from the start, the lesson shows the real process: listening repeatedly, slowing the tune down, testing chord functions, rejecting ideas that feel too heavy, and gradually discovering motifs that suit the character of the melody.
For bouzouki players, this is valuable because it shows how accompaniment grows organically. You begin with drone notes and basic harmonic function, then refine the rhythm, leave space where needed, and introduce just enough melodic movement to make the backing feel alive and traditional.
- Use repeated listening to find the tonic and place the capo where the tune resonates naturally on the bouzouki.
- Build the accompaniment first from chords I, IV, and V before adding secondary harmony such as chord vi.
- Leave space in the arrangement so the melody can breathe, then add simple counter-melody ideas where they genuinely help.
Finding The Key And Setting The Capo
The first practical step in the lesson is to listen carefully to the tune and search for the tonic by ear. Rather than reaching for notation immediately, the idea is to sing or hum the tonal centre internally and then locate that note on the instrument. Once that drone note has been found, the capo position becomes much clearer.
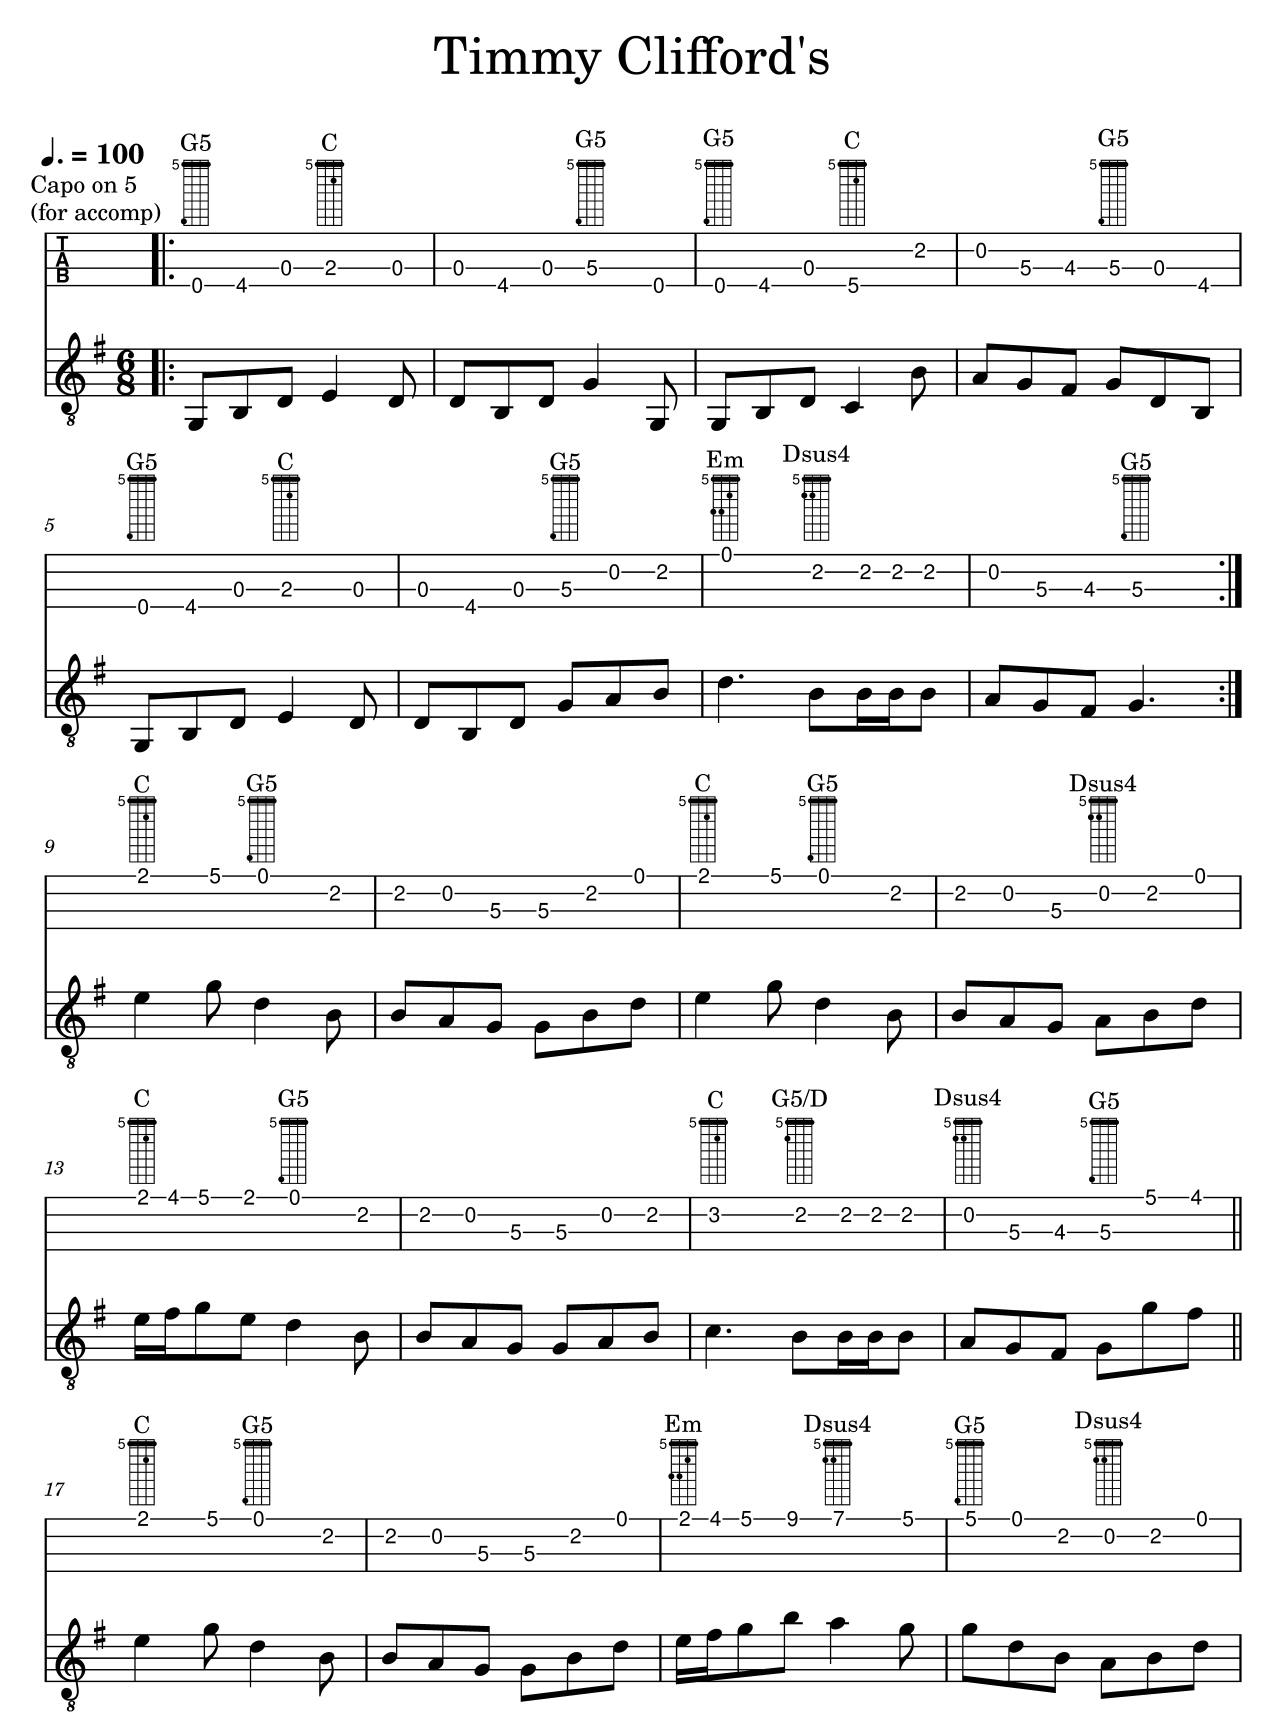
In this case, the tune was treated in E major, with capo 2 for the accompaniment approach being explored. That makes the bouzouki ring more naturally and keeps the sound resonant, which is particularly important in traditional accompaniment. The capo is not an optional extra here. It is a central part of getting the warmth and open-string shimmer that bouzouki accompaniment needs.
The lesson also makes an important point: it is worth trying to work the tune out without the capo as an exercise, but the musical result for traditional playing is often stronger with the capo in place. Guitarists can sometimes avoid a capo and rely on complex shapes, but for Irish bouzouki the ringing quality of open and semi-open textures is part of the style.
Pro Tip: When you are unsure where the capo should go, do not think in abstract theory first. Find the tonic drone on the instrument, move chromatically until it locks in with the recording, and let your ear confirm the position.
Starting With Primary Harmony
Once the key is secure, the accompaniment begins with the three primary functions: chord I, chord IV, and chord V. In E major, that means E, A, and B in functional terms. On the instrument, these may appear as power-chord or suspended shapes, but the essential teaching point is that their harmonic role matters more than the label attached to the voicing.
This is one of the clearest lessons in the transcript. The bouzouki player does not need a dense jazz harmony to make a jig work. Instead, the accompaniment should be grounded in strong tonal movement. Chord I establishes home, chord IV opens the sound outward, and chord V gives direction and creates pull toward a return.
The initial A section was mapped largely through these primary harmonies. The process was exploratory rather than rigid: listen, test chord I, test movement to chord IV, check the return, and then introduce chord V at the point where the phrase needs a stronger sense of destination. This is exactly how many traditional accompanists arrive at practical backing patterns in real playing situations.
Insight: A chord name on paper is less important than its function in the phrase. If the harmony sounds as though it is arriving, leaning, or returning in the right place, you are usually closer to a good accompaniment than if you simply match every melody note with a theoretically exact chord.
Another helpful detail is the physical logic of the shapes. The lesson favours movements that slide naturally and can be reached comfortably at tempo. That matters because a chord choice is only useful if it can be played musically. An easier suspended or power-chord version may be preferable to a fuller voicing if it allows smoother movement and better rhythm.
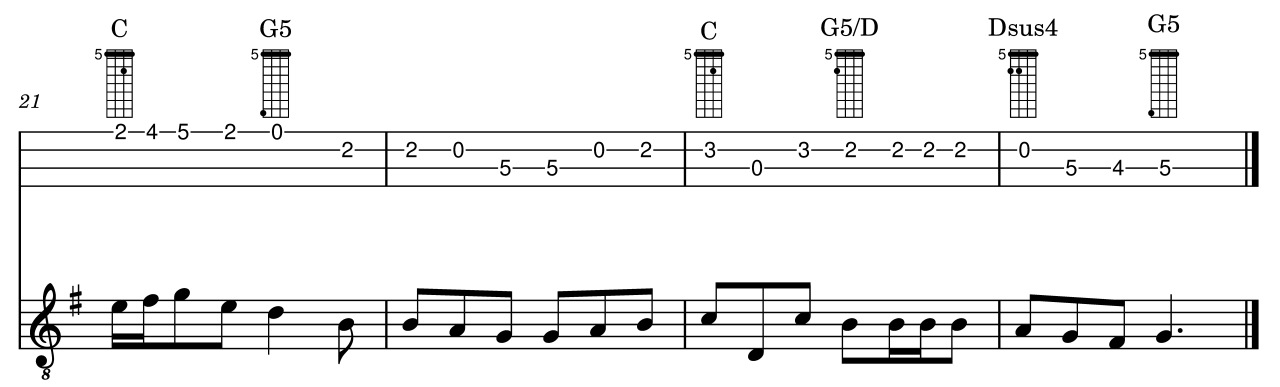
A Simple Harmonic Map For The Tune
As the lesson develops, one secondary chord becomes especially important: chord vi, which in E major is C sharp minor. This appears in the second half of the phrase and adds colour without overcomplicating the arrangement. The value of this moment is not that it makes the harmony clever, but that it gives the tune a slightly richer turn while still sounding idiomatic.
| Section | Main Harmonic Focus | Musical Purpose |
|---|---|---|
| Opening Of A Section | Chord I | Establishes the tonic and gives the tune a stable home base. |
| Middle Motion | Chord IV | Opens the harmony and supports forward movement in the phrase. |
| Cadential Pull | Chord V | Creates tension and leads the ear toward resolution. |
| Colour Chord | Chord vi | Adds contrast and depth in the second half without disturbing the traditional feel. |
Practice Box: Learn the tune in layers. First drone the tonic. Next add only chords I, IV, and V. Then isolate the spot where chord vi appears and loop it until the change feels obvious and relaxed.
69cd383e761f4_lg.png)
Why Too Many Chords Weaken the Tune!
One of the strongest teaching points in the session is the warning against over-harmonising. It is tempting to change chords every beat so that every melody note is perfectly supported. On paper, that may look sophisticated. In practice, it often sounds stiff, over-arranged, and rhythmically heavy.
Traditional accompaniment should give shape and lift, not suffocate the tune. If the left hand is constantly shifting and every beat receives a fresh harmony, the listener stops hearing the melody breathe. The tune becomes boxed in. This is especially damaging in a jig, where lilt and flow matter more than theoretical completeness.
The lesson compares a version with too many chord changes against a version with several of those changes removed. The simplified version is clearly stronger because it leaves space. Cadences sound more purposeful, phrase endings feel more natural, and the accompaniment becomes part of the groove rather than a series of interruptions.
Common Mistake: Do not assume that every note in the melody needs its own chord. A harmony can feel right because of where it leads, not only because it matches every passing note exactly. Too many changes make the accompaniment sound busy and heavy.
This also leads to a deeper musical principle: chord function can outweigh note-for-note matching. At the end of a phrase, a dominant-feeling chord may be the best choice even if one melody note creates a slight clash. If the overall cadence sounds convincing, the accompaniment is doing its job.
Developing Counter Melodies And Motifs
After the harmonic framework is secure, the lesson moves into counter-melody writing. This does not mean writing an elaborate second tune from scratch. Instead, it means finding small shapes that respond to the melody: a descending scale at the cadence, an arpeggiated figure, a hammer-on roll, or a short line that moves in contrary motion.
The opening ideas in the A section come from following the melody fairly closely at first. That creates security. Once the hand and ear know where the main target notes lie, the accompaniment can begin to branch out. Some motifs land in unison with the melody, while others deliberately move against it to create a more interesting texture.
A particularly useful insight is that not every decorative figure has to appear every time. Rolls, hammer-ons, full strums, and little answering phrases can be rotated. One repeat may be simpler, while the next includes a stronger flourish. This prevents the arrangement from becoming mechanical.
The transcript also shows the reality of discovery: ideas often appear only after repetition. A motif that is unclear for twenty minutes may suddenly reveal itself once the player has heard the phrase enough times. That is not wasted effort. It is exactly how traditional musicians develop personal accompaniment language.
Quote Insight: The most useful melodic ideas are often not the first ones you play. They emerge after repeated listening, patient looping, and noticing where the tune itself seems to invite an answer.
Using Slow Practice, Pitch Tools, And MuseScore
A major practical theme in the lesson is the use of technology to support learning. Pitch adjustment software helps align a recording that may sit slightly sharp or flat because of compression or transfer. Even a tiny fine adjustment can make practice more comfortable and improve the sense of blend with the source audio.
Slowing the tune down is equally important. Rather than forcing the hands to chase full-speed jig tempo, the lesson keeps returning to a reduced speed, roughly in the mid-80 percent range, so detail can be heard clearly without destroying the feel of the music. Slow practice is not a beginner shortcut. It is the professional route to accuracy and confidence.
MuseScore is then used as a practical practice partner. By importing MIDI from a tune source, selecting bars, and repeating sections, a player can work on the exact passage that keeps causing trouble. This is far more musical than mindlessly working with a click alone. A metronome is useful, but hearing the melody repeatedly in context gives the hands something meaningful to respond to.
Practice Box: When a phrase keeps going wrong, do not replay the whole tune. Loop only the troublesome bars in MuseScore or another slowdown tool, then alter one small detail so your memory attaches to a new, clearer pattern.
Practice Routine For This Lesson
Start by listening to the tune several times without playing. Sing or hum the tonal centre, then find that tonic note on the bouzouki and confirm the capo position by ear.
Next, drone the tonic along with the tune. Do not add chords yet. Let your ear settle into the key and the overall shape of the A and B sections.
After that, map only the primary harmonies. Play chord I, then test chord IV and chord V where the phrase seems to open or lean toward a cadence. Keep the rhythm simple and leave space.
Once that feels natural, isolate the one important secondary harmony, chord vi. Loop the phrase where it appears until the hand knows the change without panic or hesitation.
Then practise the opening motifs and the ending options separately. Work on the hammer-on figures, arpeggiated responses, and descending scale endings as short fragments rather than as part of the full tune.
Finally, put the accompaniment together slowly with the recording or notation playback. Only increase the tempo when the chord movements, target notes, and phrasing all feel calm and intentional.
Lesson Summary
Key Takeaways
✅ Strong bouzouki accompaniment begins with hearing the key clearly, finding the tonic, and placing the capo where the instrument resonates naturally.
✅ Chords I, IV, and V do most of the important work in this tune, while chord vi adds colour at a specific moment without overcomplicating the arrangement.
✅ The best traditional backing leaves space for the melody, rather than changing chords on every beat just because the harmony could do so.
✅ Counter melodies grow out of repeated listening, target notes, and small motifs such as hammer-ons, arpeggios, and simple scale movement.
✅ Tools like slowdown software and MuseScore are most useful when they help you isolate, repeat, and internalise one musical problem at a time.
FAQ
Do I Need To Learn The Tune Note-For-Note Before Accompanying It?
No, but you do need to know the shape, the tonal centre, and where the phrases begin and end. A good accompanist may not play the melody exactly, but should understand the tune deeply enough to support its structure and flow.
Why Is The Capo So Important On Irish Bouzouki?
The capo helps preserve resonance and open-string colour, which are central to traditional bouzouki accompaniment. It also makes it easier to use familiar shapes in different keys without losing the ringing texture that supports the tune so well.
Should I Match Every Melody Note With A Chord?
Usually no. In traditional accompaniment, too many chord changes can make the music sound stiff and over-arranged. It is often better to keep the harmony simpler and allow the melody, rhythm, and phrasing to breathe.
How Do I Practise A Difficult Passage More Effectively?
Loop a very small section, slow it down, and focus on one musical goal at a time, such as one chord change or one target note. This is much more efficient than repeatedly playing the entire tune and hoping the difficult spot improves on its own.
Can I Use MuseScore Even If I Am Not Great At Reading Music?
Yes. MuseScore is useful not only for notation reading, but also for playback, looping, tempo control, and section practice. Even if your reading is limited, it can still function as a practical rehearsal tool that keeps the melody in front of you while you work.
Categories: : Irish Traditional Music
Did this article answer all your questions?
If you have any questions, or you want to learn more,
Click the Picture Below to Join the Community for FREE!