Figured Bass for Grade 6 Theory: How to Realise Question 2 Step by Step
 Declan Plummer
Learn figured bass for Grade 6 Theory with a clear step-by-step guide to Question 2, including inversions, doubling, spacing, and voice leading.
Understanding Figured Bass For Grade 6 Theory
Figured bass in Grade 6 Theory means adding upper parts above a written bass line by reading the figures underneath it. To answer this question well, you need to recognise root position, first inversion, and second inversion chords, choose sensible doublings, keep the inner parts smooth, and avoid parallel perfect 5ths and 8ves.
Question 2 in Grade 6 ABRSM Theory often feels difficult at first because it combines harmony, chord recognition, spacing, and voice leading all at once. However, once you understand what the figures mean and how the upper voices should move, the task becomes far more logical and manageable.
This lesson focuses on the practical side of realised figured bass. Rather than treating it as an abstract historical idea, it helps you see how to turn a bass line into a complete four-part texture. That means learning how chords are built above the bass, how to choose which note to double, and how to avoid the most common mistakes in the exam.
Although figured bass comes from Baroque music, the method is still very useful for training your harmonic thinking. It teaches you to hear chord shapes, recognise inversions quickly, and write more controlled part-writing. These are exactly the skills that Grade 6 Question 2 is designed to test.
- Figured bass tells you which intervals to place above a written bass note.
- For Grade 6, the main figures to know are root position, 6, and 6/4.
- Successful answers depend on smooth inner parts, careful doubling, and avoiding parallel perfect 5ths and 8ves.
What Figured Bass Means
Figured bass developed in Baroque music as part of the basso continuo tradition. A keyboard or chordal instrument would play from a bass line, and the figures written underneath told the player which notes or intervals should be added above that bass. In performance, the player would realise the harmony from those figures.
In other words, the bass note is given to you, but the full chord is not fully written out. Your job is to understand the figures and supply the upper parts correctly. In Grade 6 Theory, this is usually done in four parts: bass, tenor, alto, and soprano.
Pro Tip
Practice recognising the shape of root position, first inversion and second inversion triads as they're written on the page. This should help you speed up your writing of chords and inverted chords for this figured bass exercise.
The Three Main Figures You Need
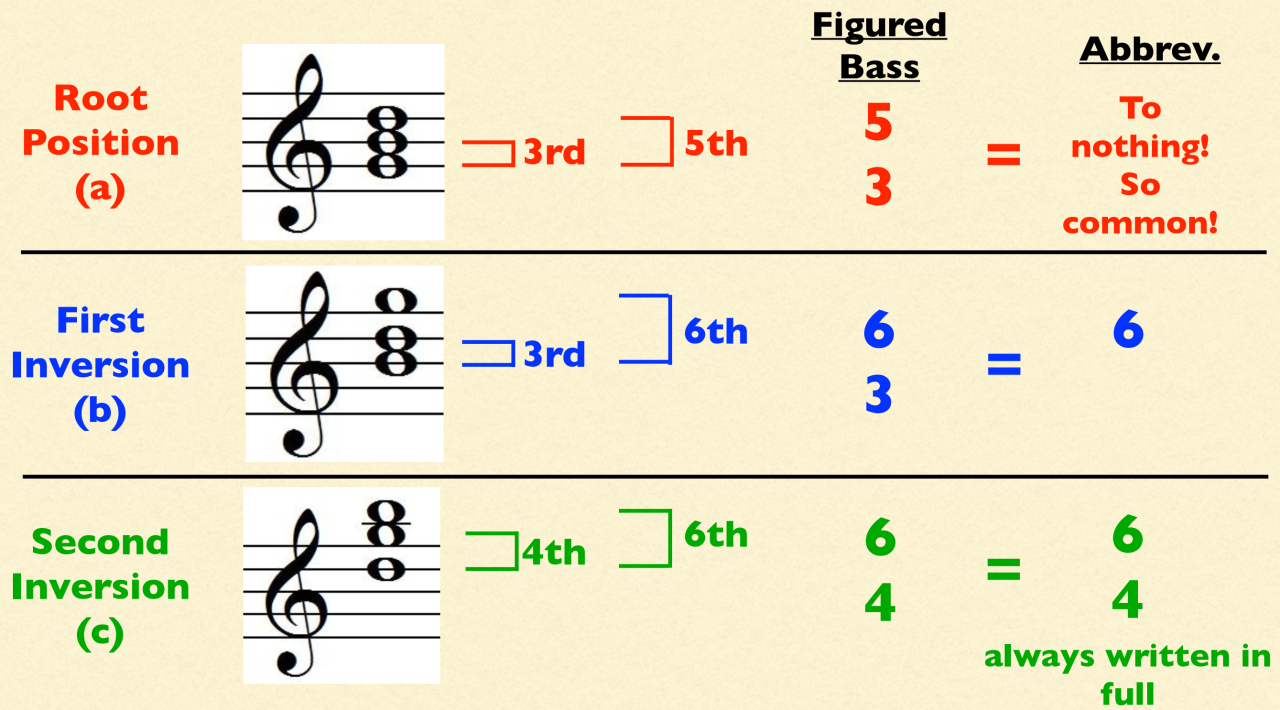
For Grade 6, you do not need every possible figured bass symbol. The exam mainly expects you to recognise three common chord types: root position, first inversion, and second inversion. These are enough for most standard exercises.
| Chord Type | Full Figure | Usual Abbreviation | What It Means |
|---|---|---|---|
| Root Position | 5/3 | Usually nothing written | Add a 3rd and a 5th above the bass |
| First Inversion | 6/3 | 6 | Add a 3rd and a 6th above the bass |
| Second Inversion | 6/4 | Must be written in full | Add a 4th and a 6th above the bass |
A root position chord is so common that the figures are usually omitted altogether. That means if there is no figure under a bass note, you should usually assume a root position triad. A first inversion chord is usually shown with a single 6, while a second inversion chord must be shown as 6/4 because it cannot be shortened further.
How To Read The Chords Above The Bass
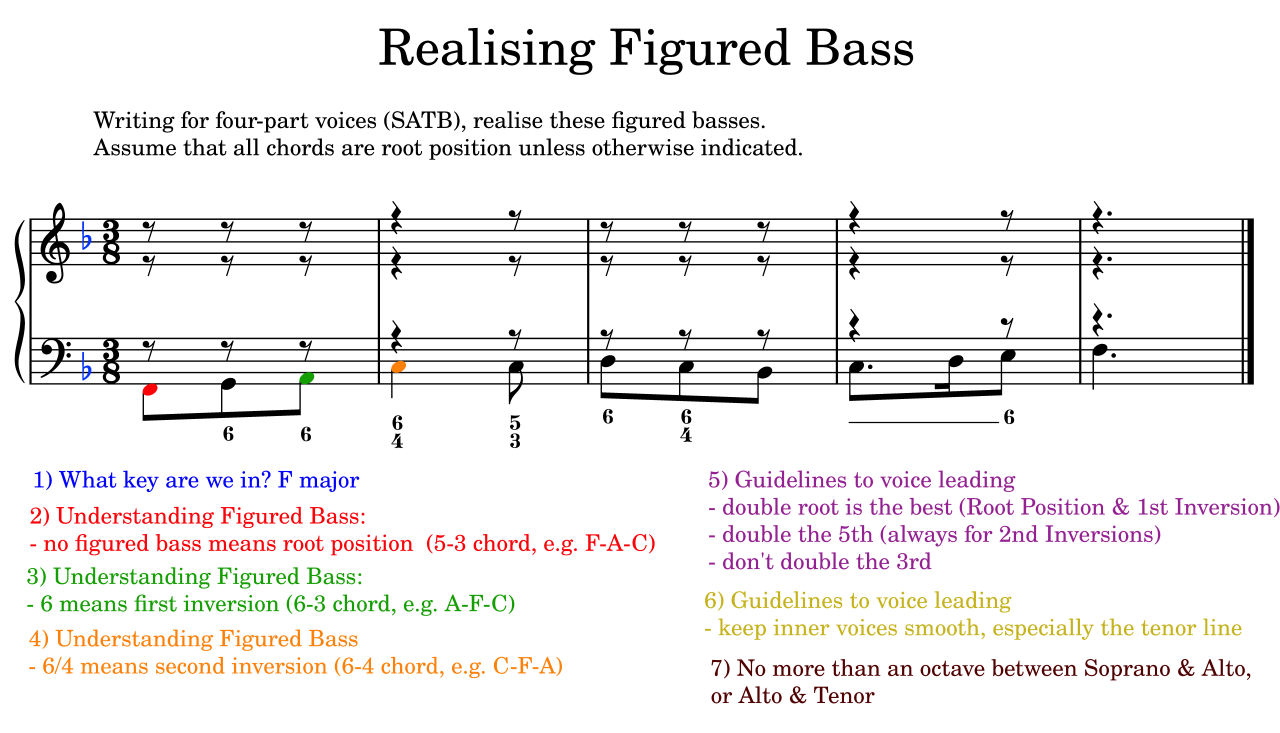
When you see a bass note and a figure, count upwards from that bass note using the notes of the key. For example, if the bass note is F in F major and there is no figure underneath, you are looking for a root position chord. That means you need a 3rd and a 5th above F, which gives you A and C.
If the bass note is A with a 6 underneath, you need the 3rd and the 6th above A. In F major, that gives you C and F. If the bass note is C with a 6/4, you need the 4th and the 6th above C, which gives you F and A.
Insight
The figures do not name the chord directly. They describe the intervals above the bass and you practice quickly finding the triad (e.g. some student look at first inversion 6 and instantly think a 3rd below to find the root first, and immediately think triadic above that note to the find chord - this should be instantaneous!). Once you understand that idea, you can work out the notes in any key far more confidently.
Accidentals And Minor Keys
Sometimes the figures include accidentals. These tell you that one of the intervals above the bass must be altered from what the key signature would normally give. This is especially important in minor keys, where the raised leading note often appears.
For instance, if the key signature suggests E flat but the figure under a G bass note shows a natural sign next to the 6, then the 6th above the G bass must be raised to E natural. A sharp next to a number means that interval must be raised. Always apply the accidental to the interval named by the figure!
Practice Box
Before writing any notes, scan the exercise for accidentals in the figures. They often reveal whether the harmony belongs to a minor key or contains a raised leading note that will affect your chord choices.
The Best Order For Completing The Question
A very effective method is to begin at the very end and work backwards and upwards rather than starting at the first chord and moving forwards. This helps because each chord can then be chosen with the next chord already in view, making it easier to plan sensible voice leading and see already where all the voices will progress to as you go through the question.
If you start at the beginning and only later discover a problem, you may have to rewrite several chords. Working backwards helps you aim each part towards its destination. This is especially useful near cadences, where the soprano, alto, and tenor often need careful preparation and resolution.
Common Mistake
Many students write quickly from left to right and only check the harmony at the end. This often leads to awkward spacing, poor doubling, and hidden or parallel perfect intervals that are much harder to fix later.
A Practical Working Method
A reliable sequence for this question is simple. First, identify the key. Next, mark every bass note with its chord type: root position, 6, or 6/4. Then decide the notes required above each bass note. After that, choose sensible doublings, keep the inner parts as smooth as possible at all costs, and check every chord against the next one for parallel perfect 5ths and 8ves.
If there is a continuation line after a figure, it means the harmony above should continue while the bass moves. This is easy to miss, so it should always be noticed early in the process.
Voice Leading, Doubling, And Spacing
Because you are writing four parts from three-note chords, one note must be doubled in each triad. In most root position and first inversion chords, doubling the root is usually the safest choice. In second inversion chords, doubling the fifth of the chord (i.e. the bass note itself) is generally the best option.
The inner parts, especially the tenor, should move as smoothly as possible - this cannot be overstated! Stepwise movement is ideal, and repeated notes in the tenor and alto are often very useful. Large leaps in the tenor or alto usually make the texture clumsy and increase the risk of errors.

Spacing also matters. The gap between soprano and alto should not exceed an octave, and the same applies between alto and tenor. However, the distance between tenor and bass may be more than an octave, and that is perfectly normal in four-part writing.
Pro Tip
If your tenor line is calm, mostly stepwise, and as repetitive as possible, you are usually heading in the right direction. Smooth inner parts are one of the clearest signs of strong realised figured bass.
Which Notes To Double
- In root position chords, doubling the root is usually best.
- In first inversion chords, doubling the root is still often a safe choice.
- In second inversion chords, doubling the fifth of the chord should happen.
- Avoid doubling the 3rd in primary chords unless there is a very good reason.
- In diminished chords, doubling the 3rd is the most practical solution.
Avoiding Parallel Perfect 5ths And 8ves
The biggest challenge in this question is usually avoiding parallel perfect 5ths and parallel perfect 8ves. These occur when two parts move in the same direction from one perfect interval to another perfect interval of the same kind. They weaken the independence of the parts and are not acceptable in this style.
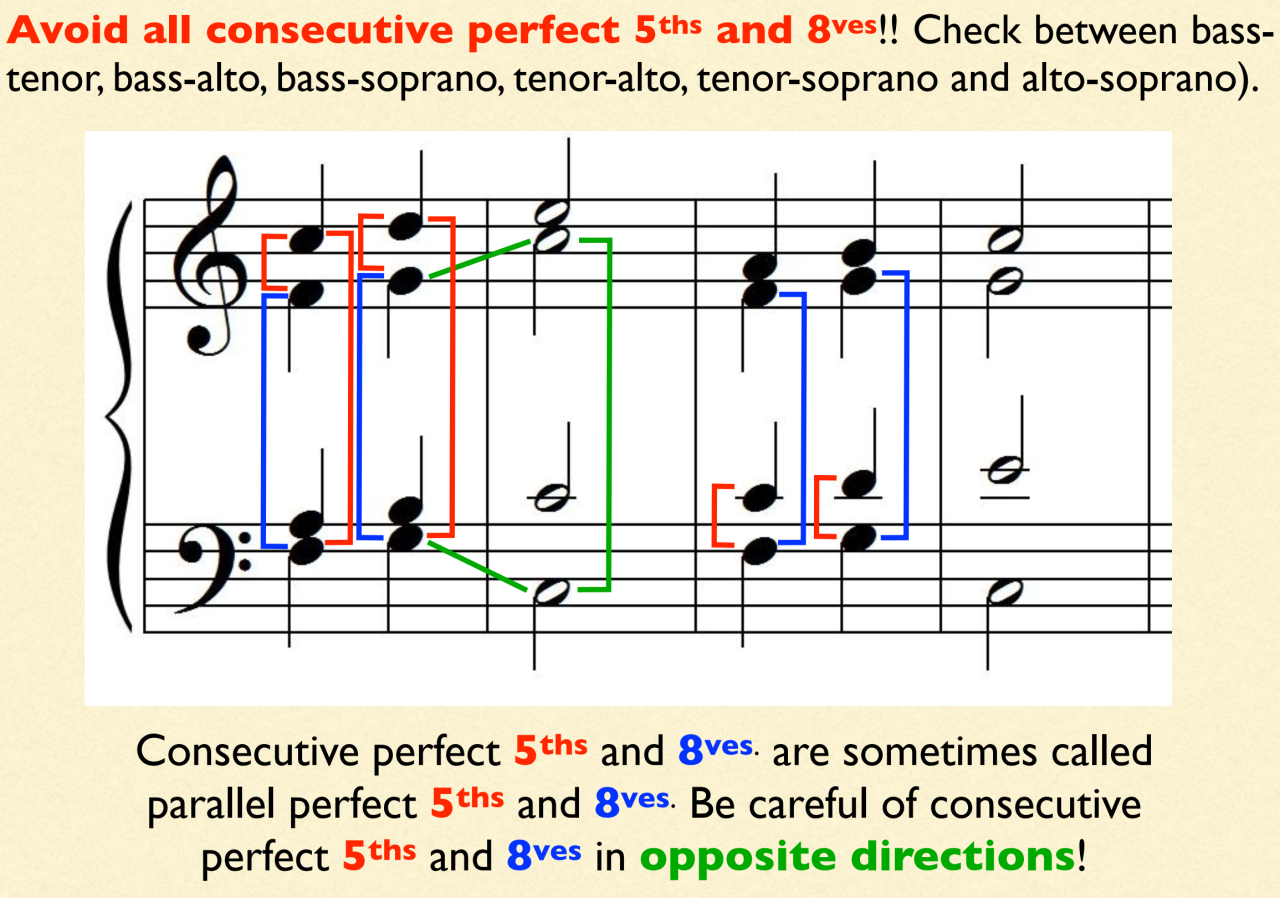
You must check between every pair of voices, not only between soprano and bass. Also watch for hidden perfect intervals in the outer parts, especially when the soprano leaps in the same direction as the bass onto a perfect 5th or octave.
Common Mistake
A chord may look correct on its own, but still be wrong because of how it connects to the next chord. Always judge harmony in pairs, not as isolated blocks. This is why working backwards can help, because you already see the next chord and can check for parallel perfect 5ths and 8ves as you go!
A useful habit is to check each new chord as soon as you write it. That way, if there is a problem, you only need to adjust one voice rather than rewrite the whole exercise. Often a simple change of doubling or a different soprano note will solve the issue.
Special Features To Notice In Exam Questions
Some figured bass questions include details that deserve extra attention. A 6/4 moving to a root position chord can suggest a cadential pattern, where the upper notes resolve in a very specific way (6th falling to the 5th in the next chord, and the 4th falling to the 3rd in the next chord). A continuation line means the upper harmony remains while the bass changes. In minor keys, accidentals often point to the raised 7th of the scale.
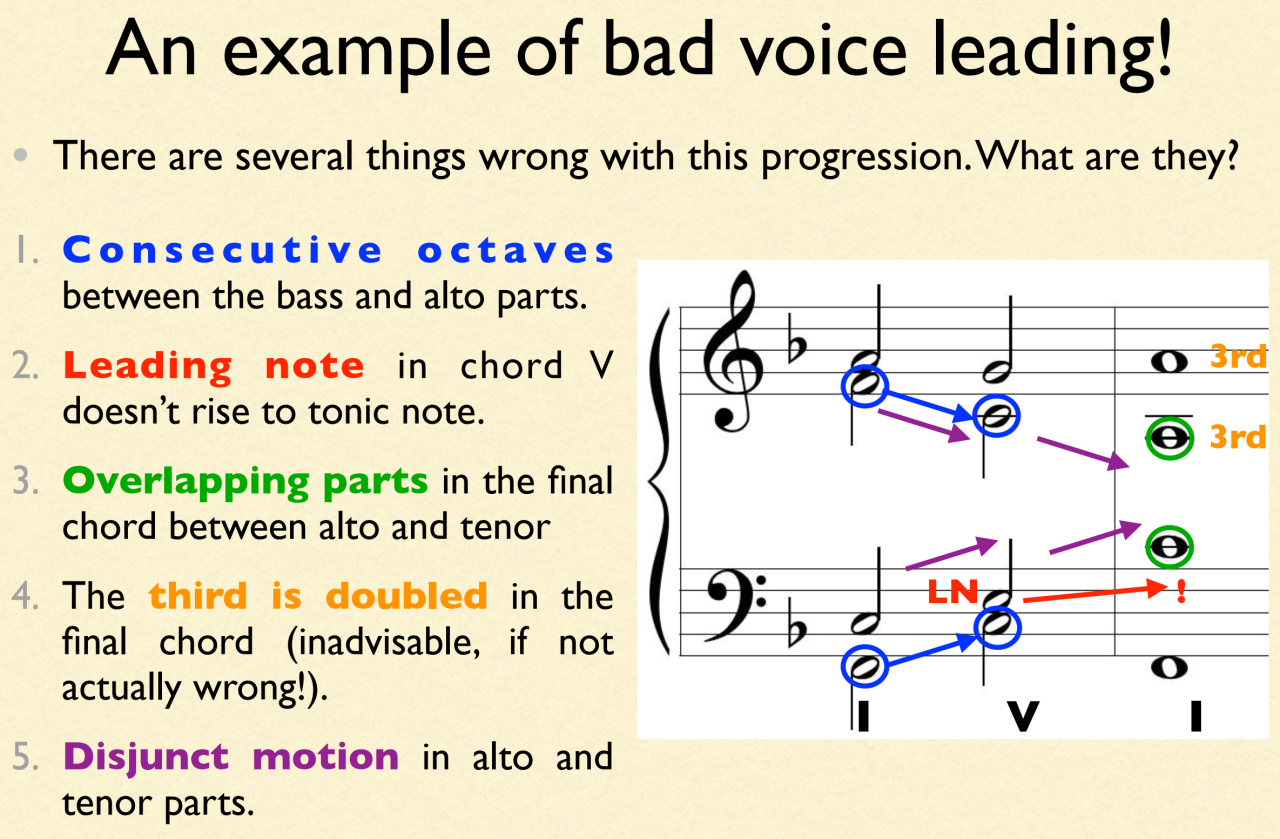
You should also pay attention to the leading note. In traditional harmony, the leading note usually rises to the tonic when the harmony changes. If you notice this tendency early, your part-writing will often become smoother and more convincing.
Insight
The best realised figured bass does not just spell the right chords. It sounds directed, balanced, and singable. Good voice leading makes the harmony feel musical rather than mechanical.
Step-By-Step Practice Routine
Begin by identifying the key from the signature and the musical context. Then label each bass note mentally as root position, first inversion, or second inversion according to the figures shown.
Next, write out the notes that belong above each bass note. Do not worry about exact placement yet. Simply make sure you know the correct chord members in the key.
After that, complete the final chord and the cadence area first. Once the ending is secure, work backwards through the exercise, choosing the smoothest possible movement for the alto and especially the tenor.
At each chord, decide which note should be doubled. Prefer the root in root position and first inversion chords, and usually double the fifth in 6/4 chords. Keep the tenor and alto close and mostly stepwise.
Finally, check carefully for parallel perfect 5ths, parallel perfect 8ves, hidden perfect intervals in the outer parts, crossed parts, and awkward spacing. Play the harmony if possible, because your ear often detects problems that your eye may miss.
Key Takeaways
✅ Figured bass tells you which intervals to place above the written bass note, and Grade 6 mainly focuses on root position, 6, and 6/4 chords.
✅ Root position chords usually have no figure written, first inversion is shown by 6, and second inversion must be written as 6/4.
✅ The safest approach is to keep the inner voices smooth, double carefully, and check every chord connection for parallel perfect 5ths and 8ves.
✅ Working backwards from the cadence often makes the whole question easier because you can guide each voice towards where it needs to go.
FAQ
Do I Need To Know Every Figured Bass Symbol For Grade 6?
No. For Grade 6, the most important figures are root position, first inversion shown as 6, and second inversion shown as 6/4. More advanced figures, such as those involving sevenths and suspensions, are not the main focus at this level.
Why Is Nothing Written Under Some Bass Notes?
When no figure is written, it usually means a root position triad. In full, this would be 5/3, but because that shape is so common, the figures are usually omitted.
What Is The Best Note To Double?
In most root position and first inversion chords, doubling the root is the safest choice. In second inversion chords, doubling the fifth is usually preferred. The final decision should always support smooth voice leading.
How Do I Spot A Minor Key In Figured Bass?
Look for accidentals in the figures or in the bass line, especially signs that raise the leading note. These are common clues that the harmony belongs to a minor key rather than a major one.
What Is The Most Important Rule In This Question?
The most important practical rule is to keep the inner voices smooth while avoiding parallel perfect 5ths and 8ves. If your tenor and alto move calmly and your chord connections are checked carefully, the harmony will usually be much stronger.
Categories: : Music Theory
Did this article answer all your questions?
If you have any questions, or you want to learn more,
Click the Picture Below to Join the Community for FREE!